- Home
- keyboard_arrow_right Phelan Dental Seminars
- keyboard_arrow_right Altering The Gingival Levels For Anterior Dental Implants

I wanted to create a follow up post for the series of articles I created last spring that discussed techniques to treat a hopeless central incisor. If you recall I left the series with the dental implant placed using a flapless technique with a Surgiguide created from the Simplant treatment plan. I created an immediate implant provisional crown but I left the facial emergence profile really flat during the initial healing so I would not stretch the tissue too much post surgically.
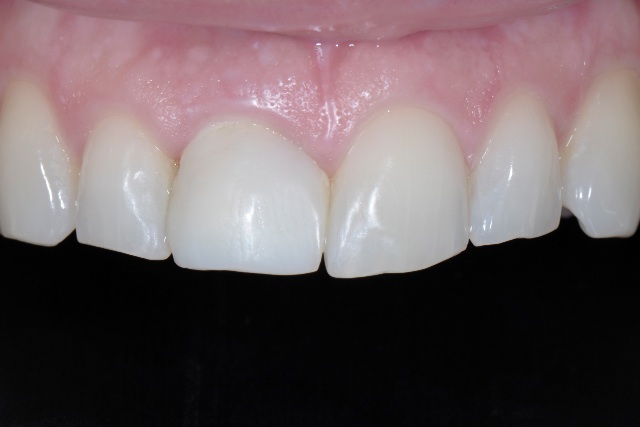
The post surgery results were very good and the interdental papilla level was excellent but its shape and the free gingival margin were located too far incisally. This gingival asymmetry leads to a result that makes the implant provisional crown look too short compared to the adjacent natural central incisor.
There are two techniques that will correct this problem.
1. Adjust the gingival tissue surgically.
2. Adjust the provisional crown contours.
I thought about which option would work better for my patient and because the initial provisional crown was slightly under-contoured I decided the best option was number 2.
Adjusting the subgingival contours of an anterior implant provisional will have a dramatic effect on the free gingival margin. If the free gingival margin is slightly too far apically you can try to flatten the emergence profile to encourage the gingival tissue to migrate incisally. If the free gingival margin is too far incisally, such as this case, you can add to the provisional contour to encourage the gingival tissue to migrate apically.
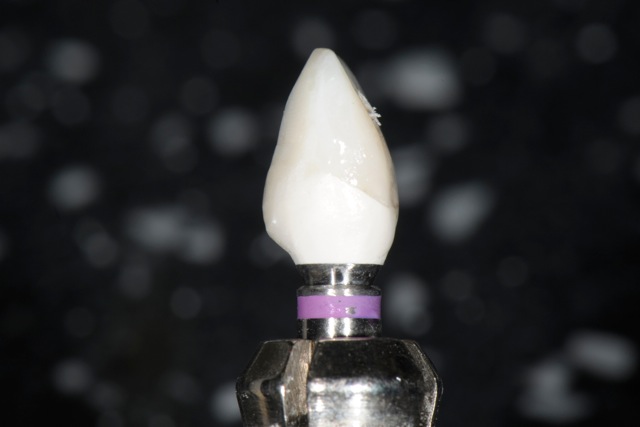
The technique that I use in my practice is to mark the free gingival margin right on the provisional in the mouth with a pencil. I then unscrew the provisional crown and add flowable composite resin to the portion of the provisional below the pencil line. You want a screw retained provisional for a case like this because the tissue will resist seating the over-contoured provisional.
Once you are satisfied with the contour of the provisional you will screw it back into place and assess the results. If you have added enough flowable composite to change the gingival tissue levels you will see a fair amount of blanching of the tissue. I will leave this in place for about 5 to 10 minutes and then reassess the tissue colour and position.
If the free gingival margin is still too far incisal I will remove the provisional and add more flowable composite subgingivally and then try it in again.
If the free gingival margin is too far apically, I have added too much flowable composite so I will remove the provisional and remove some of the composite. I will then try the provisional into place and reassess the tissue levels.
As you can imagine all of this takes a little trial and error and time. This is the reason my fees for anterior dental implants are so much more than for molars. I feel that I need to spend this time to make sure that the tissue levels are ideal BEFORE the final custom porcelain restoration is created.
Once you are satisfied with the final gingival tissue levels you need to assess the tissue colour. If the tissue is still blanched I will continue to wait until the colour returns to normal which can take up to 30 minutes. I prefer not to dismiss the patient if the tissue is blanching because you may have stretched the tissues to far and run the risk of creating a pressure necrosis.
I would also recommend that you take a radiograph of your provisional in place and make sure that it is not too close to the bone.
In the next post I will share with you some of the techniques that I use to communicate the exact provisional and tissue contours to my ceramist. As always feel free to add any questions or comments using the link above this post.
Tissue levels prior to alteration.
First addition with flowable composite. 
Tissue result with first addition. The level needs to be raised apically. 
Second increment of flowable composite is added to the provisional. 
Tissue result from this addition. The free gingival margin is better but the papilla contour needs more development. 
Final addition of composite to the mesial papilla area. 
Final addition of composite to the mesial papilla area. 
Final addition of composite to the mesial papilla area. 
Final tissue contour is better but slight tissue blanching remains. 
Post comments (16)
© Copyright Phelan Dental Seminars I Dr. Stephen Phelan


Greg on January 24, 2013
How long do you wait for tissue maturation after implant/temporary crown placement before attempting any alteration of the tissue?
Dr Stephen Phelan on May 1, 2013
Greg,
I usually wait 4 to 6 weeks.
Regards,
Stephen
http://www.youtube.com on January 22, 2013
Hi there! I know this is kinda off topic but I was wondering if
you knew where I could find a captcha plugin for my comment form?
I’m using the same blog platform as yours and I’m having trouble finding one?
Thanks a lot!
Dr Stephen Phelan on May 1, 2013
I have no idea?
Peter on December 15, 2012
Stephen,
Thank-you for sharing” tissue control” with an anterior implant. Probably one of the most difficult things to do with anterior implants. Your result is terrific. Is the case canted up on the left? The tissue heights on 2:2, 2:3 look higher than 1:2 and 1:3. Or is this the angle of the photograph? Thanks again Pete
Dr Stephen Phelan on May 1, 2013
Thanks Peter, It is slightly canted, but I may have held the camera a little uneven as well.
Regards,
Stephen
ELIE on December 15, 2012
Dr Stephen hello,
Can you send the post where you hold the hemostatic forcep and inject the Mach2 die silicone, to adjust the gingival margins ?
Thank you
Regards
Dr Stephen Phelan on May 1, 2013
Hi Elie, Just look back 2 posts on the blog site.
Thanks,
Stephen
Hayk on August 15, 2012
Dear Stephen
Thank you for so thoroughly and comprehensive description of this case.
Kind regards
Hayk
Dr Stephen Phelan on August 21, 2012
Dear Hayk,
I am happy that you have enjoyed the presentation.
Best regards,
Stephen
Dr.Geevus on August 14, 2012
Nice work doc .
when did you add composite on the 12 ?? ( after/before adding composite on the provisional of 11 )
The modification made on the 12 added perfection to the result.
regards
Dr.Geevus
Dr Stephen Phelan on August 21, 2012
Thanks Dr. Geevus,
I did add composite to improve the results. I originally proposed porcelain veneers and equilibration but the patient could not accept that treatment plan so I added composite.
Regards,
Stephen
Leora Laichter on October 22, 2011
Beautiful work Stephan! Very nice restorative work, even if it is “only a temporary”. How did you manage to get a screw retained anterior crown? Was the implant placed palatally enough thereby making the screw access hole palatal? Or did you use an abutment to correct the angle?
Very nicely done.
Leora
Stephen Phelan on October 27, 2011
Hi Leora,
Thanks for the comments and to answer your question, I placed the implant myself and used Simplant to plan the ideal implant position both surgically and restoratively. I then had Simplant create a Surgiguide from my plan and I used the Straumann guided surgery kit with this guide to place the implant in the same location as my treatment plan. I did design the implant location so the screw hole would be closer to the cingulum and used a standard provisional abutment for the provisional.
Thanks again,
Stephen
Bruce Marshall on October 22, 2011
Stephan,
Just wanted to say that this is an excellent example of nice tissue shaping.
I have done some lecturing for Straumann about anterior esthetics and this is a beautifully, well detailed way to show people how to adjust contours to get the proper emergence profiles for good esthetics. Very nicely documented. I appreciate it because I know how much time and planing it takes to make this happen in a busy practice. Well done.
Warm regards,
Bruce
Stephen Phelan on October 27, 2011
Hi Bruce,
Thank you very much for the great comments! I really appreciate your feedback.
Best regards
Stephen