
I’m Dr. Stephen Phelan and welcome to Dental Excellence.
With this series of videos my idea is to create a series of shorter 10-15 minute or less videos where I’ll present one or two clinical techniques or tips or perhaps a case that I’m working on in my practice and get the word out across the various social media platforms like Facebook, Twitter, YouTube, maybe even my blog. I’m planning to post these videos on my blog, and then ultimately I’d like to create a podcast for these videos.
My goal here is to get the word out about one of my core beliefs in dentistry and dental education and that is that beautiful dentistry with precise fit and occlusion is not just for the gurus.
You know, I say this all the time but I truly believe this and if you’re watching online videos about dentistry, you know that you can do this kind of dentistry also. Because you’re investing your time and effort in online education so, you know, ultimately the next step is just having the patients come into your practice or having the patients in your practice understand that you can do this kind of dentistry for them.
And so this series of videos is meant to help inspire people about what they can do in their practice and just see what we’re doing in my practice because I have a pretty much everyday, full-time clinical practice, but I’m good at documenting cases. So, because I like to take a lot of photos and videos and I document my cases, I can share what kind of dentistry can be done in an everyday practice.
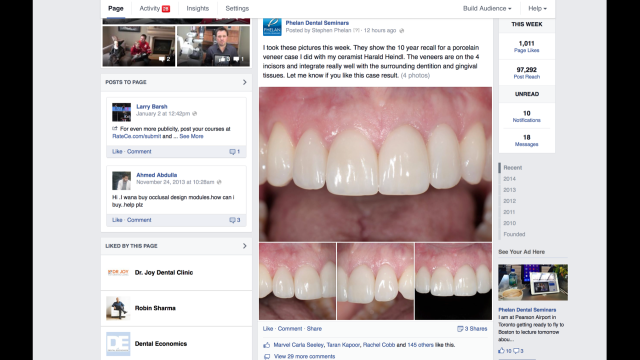
So for this particular video, the launch of dental excellence, I’d like to share with you a case that I’ve posted onto Facebook and talked about a couple of times. And it’s basically a veneer case and it illustrates another concept that I believe in my practice, and that is I’m dedicated to creating long-term results for my patients. So wherever possible, long-term clinical results, and we’ll talk about this a lot in our dental excellence videos.
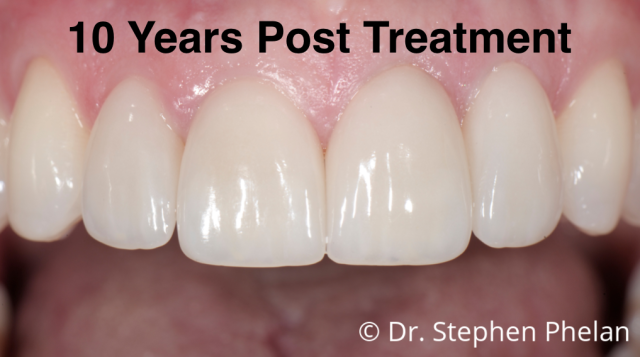
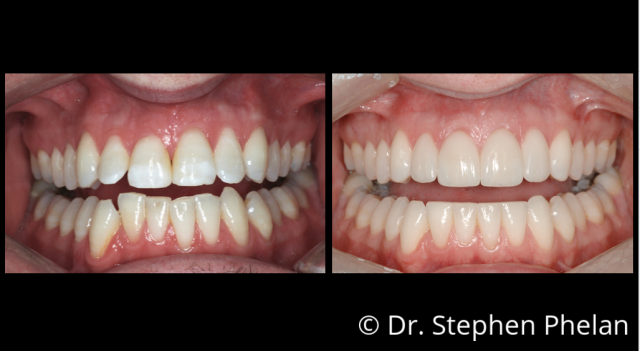
If you look at this particular patient, these are photographs I shot in September and this patient had four porcelain veneers placed by me and these are the ten-year post-op photographs for this case. So ten years post-op and when I posted these on Facebook, people thought it was amazing to have such wonderful results after ten years and I’ll tell you, again, this is what we can do in everyday practice. You know, this is not just for the gurus, this is what we can do with good lab support, good clinical techniques and really great planning and thought about how you design the occlusion.
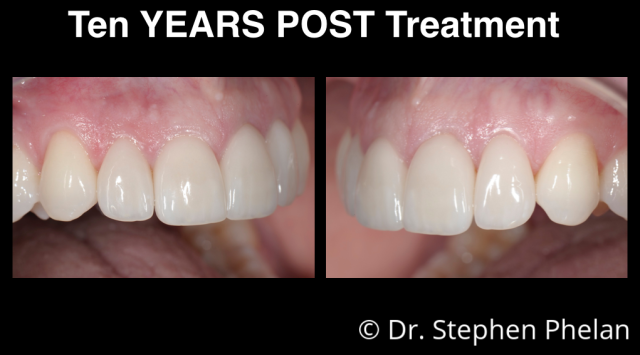
So, here are a couple of other views. You know, you can see the tissue looks good because we’ve had proper management of the tissue. The restorative tissue interface at the time that I placed the veneers, meaning I removed any excess cement that was all over the margins and I polished it properly and I had a good interface for the tissue to adapt to. The patient’s done his part by keeping his teeth nice and clean, coming in for really regular maintenance, flossing and, obviously, just having a good overall starting position or condition of his tissue to allow this kind of result to happen.
If you look at the preparations, this is a primary key that I talk about in all of my training programs when we discuss porcelain veneers, and that is that you want to prepare the case to leave the majority of enamel on the tooth. You know, I don’t want the majority of the enamel disintegrated into vapor– I want the majority of the enamel left on the tooth so that then I can bond my restorations to a preparation surface that’s almost all enamel and if you can do this, you’ll have very, very few veneers de-bond, even at the ten-year mark, even, maybe, at the fifteen-year mark. If you can do this, you can get really great, long-term success for your patients.
The mistake I see is patients coming in telling me they have veneers and they’re falling off and the thing that they have is 3/4 crown preps. It’s not veneers, it’s 3/4 crown preps. You know, the facial enamel has all been prepared and the
inter-proximal reduction has been completed to break through the contact. So if you do that, you have much less enamel to bond to, clearly, and the dentin bond, despite all the great adhesives we have, degrades at a much faster rate than the enamel bond. So at the five to ten to fifteen-year mark, you start seeing these de-bonding. So not fracturing, just de-bonding and then you have to try and re-bond them but it’s all kind of a mess and it’s hard to re-attach to this over-prepared dentin.
I’ve had a couple of patients come in with old veneers in their hands that were treated somewhere else and, you know, I basically re-bonded them but I told them, “I don’t know how long this will last.”
So my primary goal, when I’m teaching and talking about porcelain veneers, is to leave as much enamel as possible and if you look through the dental literature, that’s echoed through a lot of different research papers, retrospective papers, longevity papers, etc. The main goal is leave as much enamel as possible, that’s something I really like to drive and drive home and wherever possible, when I’m treating a veneer case that is what I do.
Now there are some cases where the patient probably should have had orthodontics, they refuse orthodontics and you might have one area or one tooth in the arch that was out of place and should have been treated orthodontically where you’ve prepped the veneer more aggressively than you would like to and it’s more like a 3/4 crown. So what I frequently do in those cases, is I’ll have, for example, six veneers being placed, but one of the teeth that’s really out of alignment, instead of a 3/4 veneer I’ll make that a jacket crown, just because I know that we’ve removed more enamel than I’m comfortable with. So I’m just going to wrap it around the palatal or lingual and make that particular restoration a jacket crown just to try and prevent this de-bonding problem and then the rest of the teeth, if the alignment allows, will be prepared as a conservative porcelain veneer case.
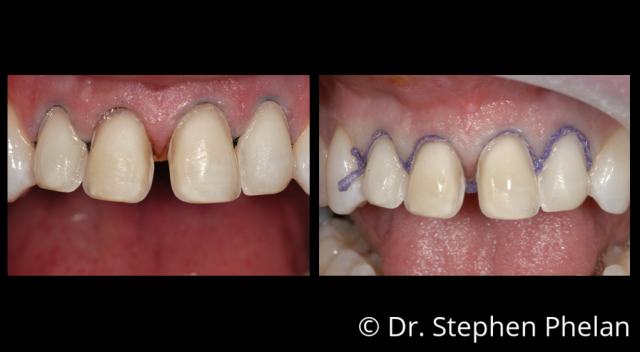
So if you look at this particular case for Ross, you can see a starting condition and when we started, his teeth were not in great alignment and the one lateral incisor was really, kind of, sticking out, labially, and I would have really had to over-prepare that tooth to get it into alignment so my suggestion to Ross was what I have suggested to most of the cases that come through the practice is do orthodontics first and he didn’t want to have braces, per say, traditional orthodontics, but he did agree to Invisalign.
 So with Invisalign, we were able to bring the lateral incisor in and level the lower incisors much better so that at the veneer insert appointment I could just equilibrate those lower incisors and level them a little bit with Soflex XT discs, some polishing discs, as oppose to a fairly aggressive enamel-plasty that would be needed if they were left as they are here. So you can see here, with the Invisalign, I was able to line up the lower incisors quite nicely and then just enamel-plasty them a little bit to have a better contacting surface for my new incisal edge position of my upper porcelain veneers.
And so that’s another key tip, you need to set up the opposing arch when you’re doing porcelain veneers so that it’s going to work with the new incisal edge position in a protrusive and lateral guidance relationship. So often, you either have to do orthodontics, veneers on the lower incisor or cuspids, or enamel-plasty, different levels of enamel-plasty and my tip to you is you should explain this to the patient at the consultation appointment, not after the veneers are placed. Because if you start grinding on the lateral incisors after the veneers are placed, typically, the patient’s going to wonder what you did wrong and, “Why are you grinding on my good teeth at the bottom?” But when you tell them at the consultation appointment then its part of the process.
So those are just tips that I would have for you. Here is Ross finished. These probably were taken around the five-year mark, these photos. And here he is when he began. Again, didn’t like his lower incisors either, but I felt that we could improve those just with Invisalign and reshaping. The upper incisors, he had a diastema with composite resin between the centrals and he just didn’t like the triangular tooth shape that he had with those teeth so we wanted to change them to a fuller tooth shape and we did that with conservative porcelain veneer restorations.
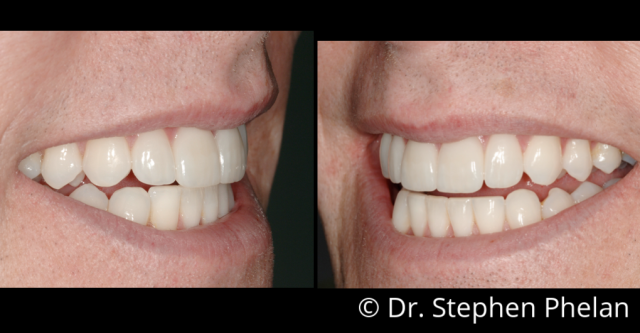
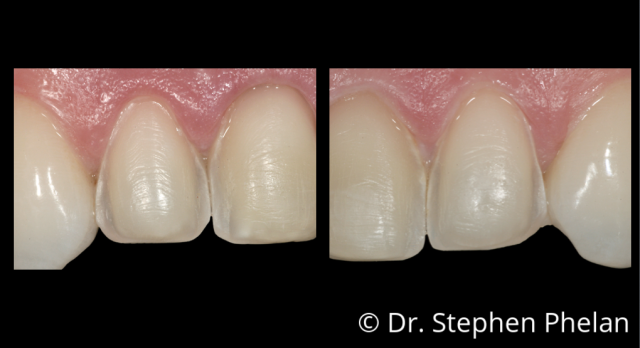
So another lateral view, you can see the aesthetic integration of the porcelain into the surrounding dentition. We have good surface anatomy, surface luster as well as shade and value.
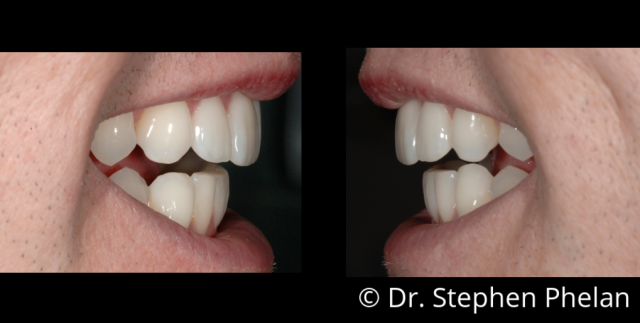
And another view. This view illustrates a point that I like to make that the porcelain veneers shouldn’t stick out, kind of protrusive; you shouldn’t have incisors that have the facial edge going to the incisal edge and kind of a facial curvature kind of surface. You want it to curve in a little bit. If you look at these incisal edges, they curve in slightly and I actually had a patient in this week– we were completing a functional analysis for her– and another dentist referred her, doesn’t like anything in her mouth. She has different restorative dentistry done at different times throughout the mouth. It’s basically going to be a full-mouth rehabilitation, but her primary concern, aesthetically, is her upper bridge. The teeth stick out on an angle and they don’t curve back in on the incisal third so, you know, that’s a fairly easy fix as long as we can find the room in the occlusion to do that. That’s a pretty effective and easy fix for me to give her what she is looking for as her primary concern, what she’s looking for resolving.
So at the three-year post-treatment, just to show you some photos as we went through the post-treatment series with this patient. I took these photos, everything looked great then. Here is a lateral view. Tissue looks great. I love the surface anatomy and luster on these restorations, they really mimic that adjacent cuspid, really mimics the adjacent cuspids and the translucency. A lot of subtle aesthetic characterizations in this case that really make it a winner and look natural. And then the ten-year post-treatment and, you know, the tissue’s maybe a little uneven– but overall I think it looks pretty darn good at ten years.
Here is another view of the ten year. And I actually video taped the entire preparation and bonding of this case, which is kind of neat, that I have all of the documentation from this case ten years ago that I video taped and edited and made into a series of DVDs, as well as, added to my online Occlusion Design membership site.
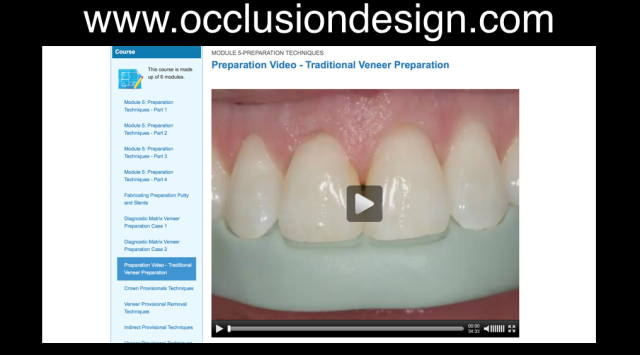
So in the fifth module of Occlusion Design, I go through the preparation of this case, in detail, with all the prep videos.
And then in the sixth module, I show bonding in this case. So if you’re an Occlusion Design member watching this, just go back, watch module five and six and keep this case in mind because it shows what I’m teaching in module five and six on that particular case video series. You know, this has long-term post-operative results for that. From the teaching aspect ten years ago filmed with a dental microscope, the Zeiss dental microscope, all the way to the post-ops now. So it’s good to have that kind of proof of principle, so to speak, of all the different, subtle, aspects of the preparations as well as the bonding in of this case.
And we posted this, as I said, to Facebook, I had a really great response. We posted it on the Phelan Dental Seminar’s Facebook page and I believe I posted it on the Dr. Stephen Phelan Facebook page as well. We had lots of likes, looks like we had a hundred and forty-something likes, twenty-nine different comments, a lot of engagement with these kinds of posts on Facebook and three different shares where people were sharing it with their own page or their own profile to say– I looked at some of these and people say things like, “Oh this is what I really want”, etc. to share with their friends and it’s typically– the shares are frequently on my Dr. Stephen Phelan page by patients and, as I said, saying, “This is what I’d like to see for my mouth.”
So that’s video number one for dental excellence and if you enjoyed this video, by all means leave a comment or question below the video. Whether that’s on my blog, on YouTube, on Facebook or hit the Facebook like button or on LinkedIn.
I’m basically planning to post this video series, as I said, on the various social media platforms that I have a profile with and I’m going to do my best to answer any questions if you didn’t have your question answered, maybe post it on my blog. That’s probably the central point where I’ll answer most of the questions– the PhelanDentalSeminars.com blog page. And, you know, that’s basically it.
So I hope you enjoyed video number one for dental excellence and just to remind you, you can do this kind of dentistry– beautiful and precise dentistry with precise fit and occlusion is not just for the gurus. So thank you very much.

Post comments (0)